All About Clipless Pedals
Clipless pedals are among the most significant bicycle innovations ever. Borrowed from skiing technology, these trick pedals make you simultaneously more efficient by providing a better foot-to-pedal connection, and more safe by offering almost instant foot entry and release. We recommend clipless pedals for road and mountain biking and everything from recreational riding to commuting and racing. They're also great for Spinning classes.
If you're new to cycling, getting new pedals and shoes (both are required for going clipless) might seem a bit much. The way to decide whether it's worth the expense is considering your cycling. If you ride regularly on loops of 10 miles or more and expect to continue riding, we think you'll love the way a clipless system enhances the cycling experience by boosting your pedal power, comfort and safety.
To help you understand this important component, we've put together this buyers' guide (use the table of contents below to jump to the different sections).
| What are Clipless Pedals? | Features & Benefits |
| Clips and Straps Versus Clipless | Buying Tips |
| Two Types | Getting Used to Riding Clipless |
| Float And Tension Adjustment | Clipless Pedal Glossary |
What are Clipless Pedals?
Clipless pedals are actually a system comprised of special pedals and cleats, devices included with the pedals that attach to the soles of clipless cycling shoes. This means that you'll need to select pedals and shoes in order to upgrade to a clipless system.
Once you have the cleats bolted to your shoes and the clipless pedals on your bicycle (we're happy to help), you simply step on the pedals to click your feet securely in place (most systems make a "click" when you're locked in). When engaged, your feet are connected to the pedals for optimum efficiency. And your feet won't come off the pedals unless you want them to. To get out, you swing your feet heels first to the outside as if you're getting ready to put your feet down, and the pedals release.
Because your feet are locked into the pedals when riding, you'll have more power throughout the pedal stroke and while accelerating and climbing. Clipless pedals also give you more control by letting you use your feet for maneuvers such as hopping pavement cracks, railroad tracks and more exciting obstacles if you're riding off road. Plus, because you can get in and out so quickly, you're more apt to get your feet down and land safely should you need to dismount quickly.
With all of these advantages, is it any wonder that almost all serious pedalers use clipless pedals today and so many new bikes come equipped with them?

Clips and Straps Versus Clipless
If you're cycling short distances and casually, basic rubber pedals work fine. As you pedal more seriously, say to achieve fitness, the speed and distance that you pedal increases and there's a risk of your feet slipping off the pedals. At the least, this is an annoyance; at the worst, it can cause a crash and injury. Also, even if you never slip off the pedals, rubber pedals allow your feet to change positions while you're pedaling, which is very inefficient.
Ideally, you'll always pedal with the balls of your feet over the centers of the pedals. Because it's difficult to keep your feet in position, toe clips and straps were invented (shortly after bicycles were invented, actually).
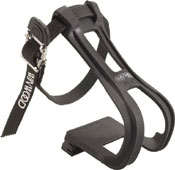
Toe clips and straps bolt to regular pedals (non clipless) and form cages to hold your feet in the correct place on the pedals and keep your feet from slipping off. This is a perfectly viable solution and one less expensive than clipless pedals and the special shoes needed to complete the clipless system.
 There are drawbacks, however. One is that the clips and straps may cut off the circulation to your feet when they're fastened tightly enough to allow efficient pedaling and control. It's also a fairly tricky two-step process to get out of the clips and straps when they're tightened because you must reach down to loosen the strap before you can pull your foot out. Also, when you're riding off road on the pedal bottoms, the toe straps hang down where they can snag on roots or sticks causing a crash.
These are just some of the reasons that clipless pedals are now de rigueur for serious cyclists. The only real disadvantage is that they take a little practice to learn how to use (true with toe clips and straps, too), and they're more costly.
Two Types
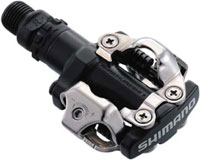
 Just like there are two places to ride, on and off road, there are two types of clipless systems. The most popular are walkable clipless systems, on which the cleats are recessed into the shoe soles. This means the cleats don't contact the ground when you walk so this clipless system is ideal for walking and even hiking. Yet, it's still incredibly efficient for maximum pedal power. Walkable clipless pedals and shoes are ideal for off-road riding, commuting, touring and century riding, too.
Many of them utilize a double-sided pedal (photo, right), which means you can click into the pedal on either side so you don't have to look down to get your feet in. This also means that if you ride your bike with regular street shoes, you'll have a decent pedaling surface even though you're not using your special cleated cycling shoes.
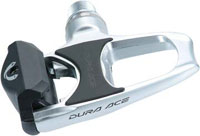
The other system is road (photo, below) and as the name implies it's designed for use on road bikes where maximum efficiency, aerodynamics and minimum weight are all important. Road shoes are lighter and stiffer than walkable models because the soles aren't lugged.
 The other difference in road clipless systems is that the cleats protrude from the soles of the shoes because the soles are so thin and light. This makes it difficult to walk in the shoes (though there are cleat covers available to protect the cleat and improve traction).
Also, road systems usually are single-sided so you must find the correct side of the pedal to click in when you start out. Most road pedals hang a certain way to make this relatively easy.
Float And Tension Adjustment
The majority of clipless systems today feature float. This is a few degrees of built-in lateral play allowing your feet to move slightly and find the optimum pedaling position. Float ensures that you won't injure your knees by riding with your feet misaligned with your knees, which was a common problem before pedals with float were invented.
Keep in mind that even though most clipless pedals offer float, it's still important to align the cleats carefully. They must be positioned to hold the balls of your feet over the pedals and to match your natural foot inclination. Our bike fitters are experts at this.
Another adjustment many clipless pedals offer is fine-tuning the ease of entry and exit. Competitive riders often set their pedals very firm because they don't want their feet popping out in all-out sprinting efforts. Meanwhile, mountain bikers like a loose setting so that they can get out with very little effort should they need to get their feet down in a hurry. A loose setting is also helpful if you're just starting out with clipless pedals.
When buying clipless pedals be sure to tell us how you'd like the pedals set-up so we can get them just right. We can also show you how to fine-tune the adjustment.
Features & Benefits
Buying Tips
| Save your bucks. You don't have to buy a company's most-expensive models to get good clipless pedals. What that extra cash buys you is lighter weight, a little more durability and sometimes added adjustability. If you don't need these extras, save your loot and go with a budget model. You'll still get excellent pedal power. |
| Be a copycat. If you haven't a clue what pedal system to buy and don't want to shop around, take the easy way out and simply ask ride partners what they ride and then follow suit. If they ride the local roads and trails the way you do, the chances are good their pedals will work for you, too. |
| Know your needs. Before shopping for pedals, figure out what you need in a pedal and shoe system. Will you walk in the shoes a lot? Do you ride trails, road, both? Are weight and high function important? The better you can define what you want, the easier it'll be for us to help you into the right system. |
| Buy a system. If you're just getting set up, the way to go is purchasing a pedal and shoe system; in other words shoes and pedals made for each other. To be sure you get such a system, you must make sure the shoes you purchase are compatible with the pedals you select. If you buy pedals and shoes from the same manufacturer, the system will work nicely. However, you may want a different shoe because it fits better. Just be sure that the shoe you pick is compatible with the pedal system you use. Most quality shoes work fine with the major pedal systems but once in a while there are mismatches and you want to avoid those. We're experts on this, so don't hesitate to ask. |
| Find a fine fit. Cycling shoes shouldn't fit like street shoes. For road shoes, purchase a glove-like fit. The shoes should be snug with just enough room up front to wiggle your toes. The foot should be held tightly inside the shoe and should not be able to slide forward and back. And your heel should fit snug and not have a tendency to lift. For mountain-biking shoes, the fit is similar except that you may walk in these shoes a lot. So, leave a little more room in the front of the shoe. Mountain biking shoes fit like tight running shoes. |
| Consider extra cleats. Cleats are included with the pedals, not the shoes. If you want to set up several pairs of shoes for use with one set of pedals, purchase cleats separately. If you log mega mileage, you might even buy a spare set to have at the ready for when your cleats wear out so you don't have to waste time finding replacements. |
| Consider extra pedals, too! If you have several bicycles, you might want to purchase clipless pedals for the ones you ride most so that you can use your clipless shoes (and enjoy all the benefits of going clipless) regardless of which bike you choose to ride. |
Getting Used To Riding Clipless
The most important thing is practicing before hitting the road or trail. This is especially important if you started with toe clips and straps, which require a different foot motion to get your feet out. Clipless pedals release by swinging your heels outward.
Teach your feet this motion while standing over the bike. You're just going to practice getting your feet in and out, not sit on the seat or ride anywhere. If you're worried about falling over, practice on a lawn or soft surface. Even better, if you have an indoor trainer, mount your bike on it and practice in place.
Click your right foot into the right pedal and remove it 30 or 40 times, and repeat with your left. It should begin to feel natural and easy. Keep clicking and releasing until you've really got it down.
When you're comfortable getting in and out of the pedals, do a short loop around the neighborhood and practice entering and exiting the pedals for real. The trickiest thing the first couple of times is remembering to swivel your heels to get out instead of pulling back (the toe-clip motion). As long as you keep the correct motion in mind you'll get your feet out just fine. If you're worried about it, plan your neighborhood test loop to end by a telephone pole you can hang onto for insurance.
If you're still having trouble getting in and out of the pedals, practice some more while standing next to the bike. There might also be something making it harder to get out of the pedals, such as a too-tight adjustment or a misaligned cleat. If that's the case, be sure to bring your bike and shoes in so we can have have a look, solve any problems and get you going.
Glossary of Clipless Pedal and Shoe Terms
Cadence - The speed you pedal measured in pedal revolutions per minute per leg. Experienced cyclists strive to maintain about 70 to 90rpm.
Cleat - The piece of metal that's attached to the bottom of the shoe that allows the shoe to engage the pedal for the foot-to-pedal connection.
Clipless system - A pedal and shoe designed to be used together for optimum efficiency, comfort and power.
Double-sided pedal - It's possible to engage both sides of the pedals; an important feature for riding off road because it makes getting back on easier.
Fixed - When your foot is held in one position on the pedal. Some pedal makers offer two cleats, one is fixed, the other offers float.
Float - A pedal feature that allows the feet to swivel slightly laterally when you're pedaling so that your feet are not locked in one position. This reduces the chance of knee injury.
Look or SPD compatible etc. - This term refers to shoes and it means that the bottom of the shoes will accept the cleats from the company mentioned. So a Look-compatible shoe will accept Look cleats.
Recessed cleats - This has more to do with the design of the shoe than the cleat. But when the term is used it refers to a clipless system on which the cleats are mounted in a recess in the sole so that you can walk in the shoes without walking on the cleat. Off-road pedals/shoes are recessed for more traction when walking.
Single-sided pedals - On these, only one side of the pedal receives the cleat. This saves weight and is the most common road clipless design.
SPD or spud or Shimano SPD - Stands for Shimano Pedaling Dynamics and refers to any of Shimano's clipless pedals though the terms SPD and spud are usually used to refer to Shimano's mountain bike clipless pedals. SPD-R refers to Shimano's road bike clipless pedals.
Tension adjustment - A screw or bolt on the pedal that allows you to adjust how hard it is to get in and out of the pedal. On double-sided pedals you can set one side looser than the other if you like.
Walkable shoes - Any of the clipless shoes on which the cleats are recessed into the soles and on which there is tread on the soles suitable for walking.
